Maintenance Mode:
Enable or disable maintenance mode during site updates. Customize the maintenance
splash page and allow selected IPs for admin testing while the site is offline.
- Introduction
- About
- Installation
- Admin profile
- Dashboard
- Manage User
- KYC Management
- Manage Referral
- User Ranking
- Countries
- Manage Investments
- Investment Plans
- All Transaction Logs
- Deposits
- Manage Withdrawals
- Request Money
- General Settings
- Email Settings
- SMS Settings
- Currency Setting
- Payment Gateways
- Manage Staff
- Manage Role
- General Settings
- Theme Manager
- Menu Builder
- Home Page
- Blog Page
- Others Page
- Custom Page
- Support Ticket
- Ticket Categories
- Push Notifications
- Newsletter Subscribers
- Clear Cache
HYIP King
HYIP King – Advanced HYIP Investment Platform Script
Updated on: December 16, 2025
By: GeniusOcean
Email: badruddoza.me@gmail.com
About
HYIP King – Advanced HYIP Investment Platform Script is a complete, all-in-one solution
designed for launching and
managing a professional online High-Yield Investment Program (HYIP). This powerful platform
comes equipped with
everything needed to deliver seamless investment management, secure financial operations,
and a smooth user
experience for both administrators and investors.
With HYIP King, users can explore and subscribe to various investment plans, monitor their
deposits, track daily
earnings, view withdrawal statuses, and manage referrals effortlessly. Investors enjoy a
centralized and intuitive
dashboard that displays their current balance, total deposits, interest earned, referral
rewards, and full
transaction history—ensuring full transparency and control over their investments.
Administrators are empowered with a robust, feature-rich admin panel that enables easy
management of every aspect of
the platform. This includes creating and customizing investment plans, managing users and
vendors, overseeing all
transactions and payout requests, controlling system settings, and much more. HYIP King also
offers advanced
administrative tools for handling KYC verification, configuring payment gateways, monitoring
platform revenue, and
ensuring a secure, scalable, and transparent investment system.
With HYIP King – Advanced HYIP Investment Platform Script, running a dynamic and modern
investment platform becomes
effortless. The script ensures optimal performance, responsive design, and a polished user
interface across all
devices, delivering a premium experience to a global audience.
Whether you're launching a brand-new investment company or expanding your existing financial
services, HYIP King
empowers your business to manage investor funds professionally, securely, and
efficiently—helping you scale with
confidence.
Installation
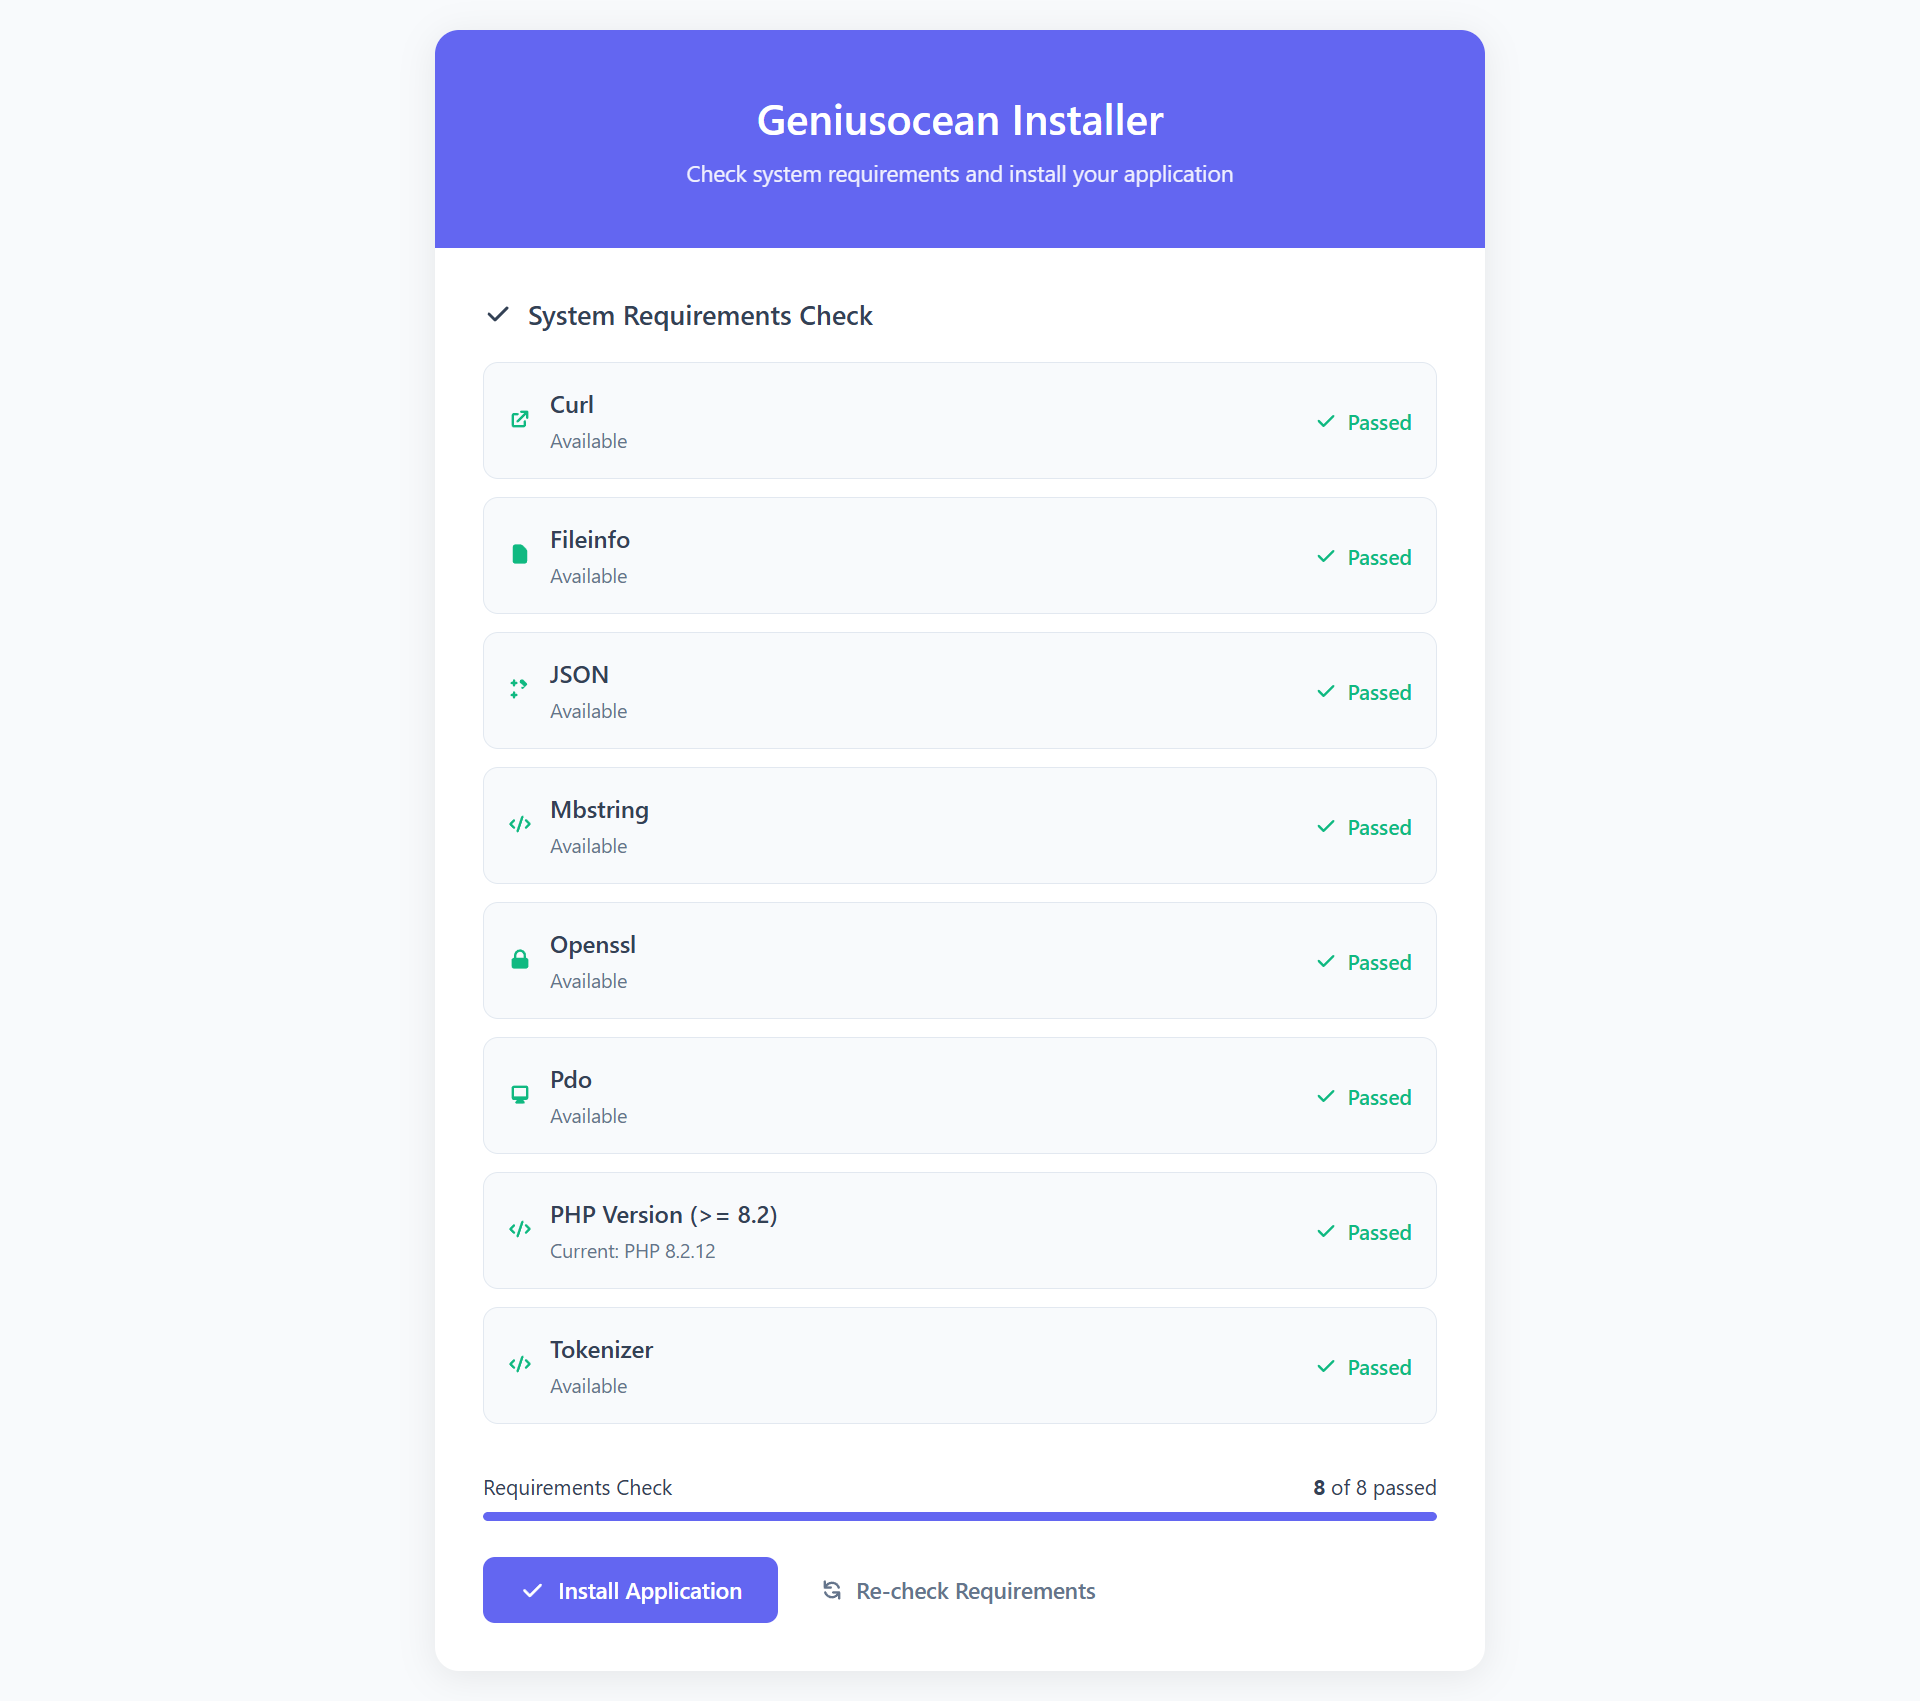
Server Requirements:
- PHP >= 8.2
- Fileinfo PHP extension
- JSON PHP Extension
- Mbstring PHP Extension
- OpenSSL PHP Extension
- PDO PHP Extension
- Tokenizer PHP Extension
- XML PHP Extension
- CURL PHP Extension
Installation Steps:
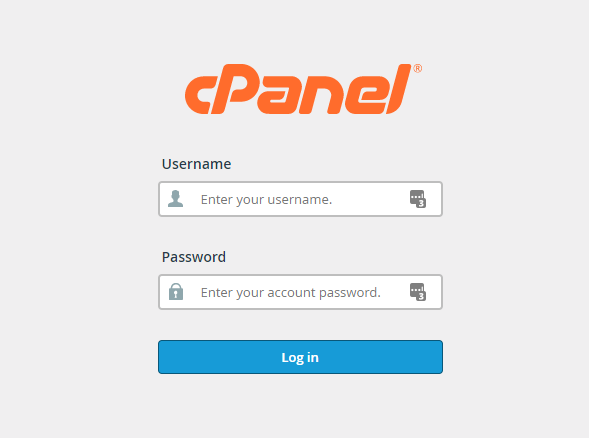
- Step 1. Login to your hosting's cpanel using the login information. You will see an interface like this:
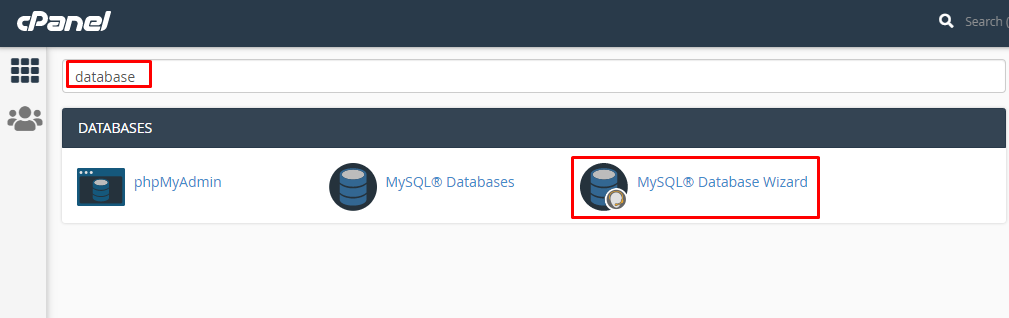
- Step 2. You will get a search section in the cpanel. Search there by writing the word "database". You will get some options. Click on "MySQL® Database Wizard" option.
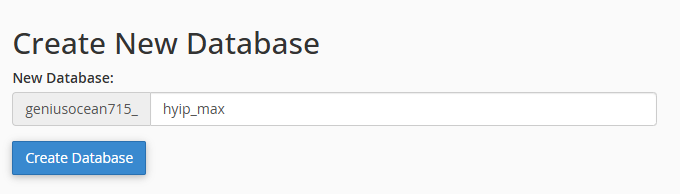
- Step 3. Then you will have to create a database. In the text field, give your database name and click on next step.
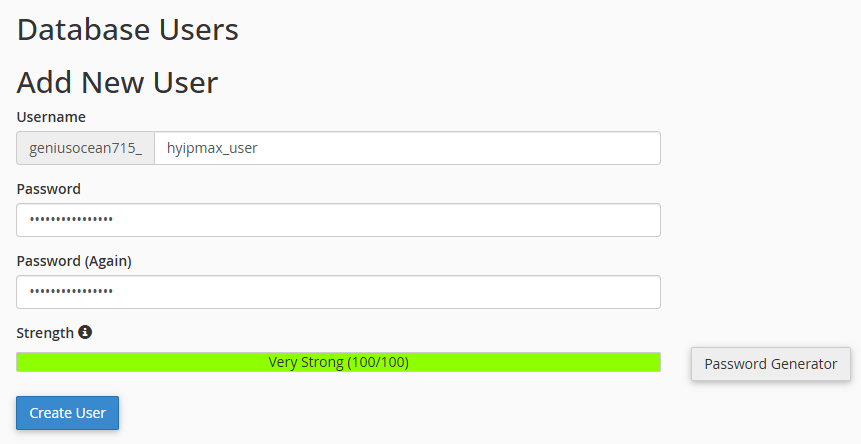
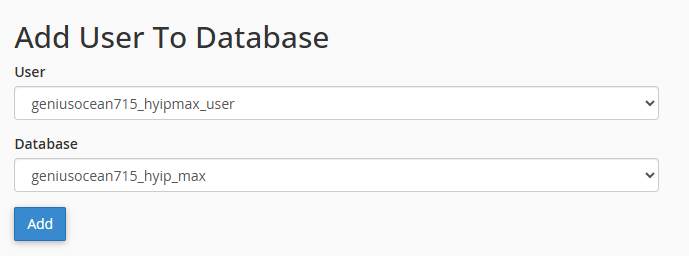
- Step 4. Then you will have to create a database user. Give your username and passwords here. Then click on "Create User" button.
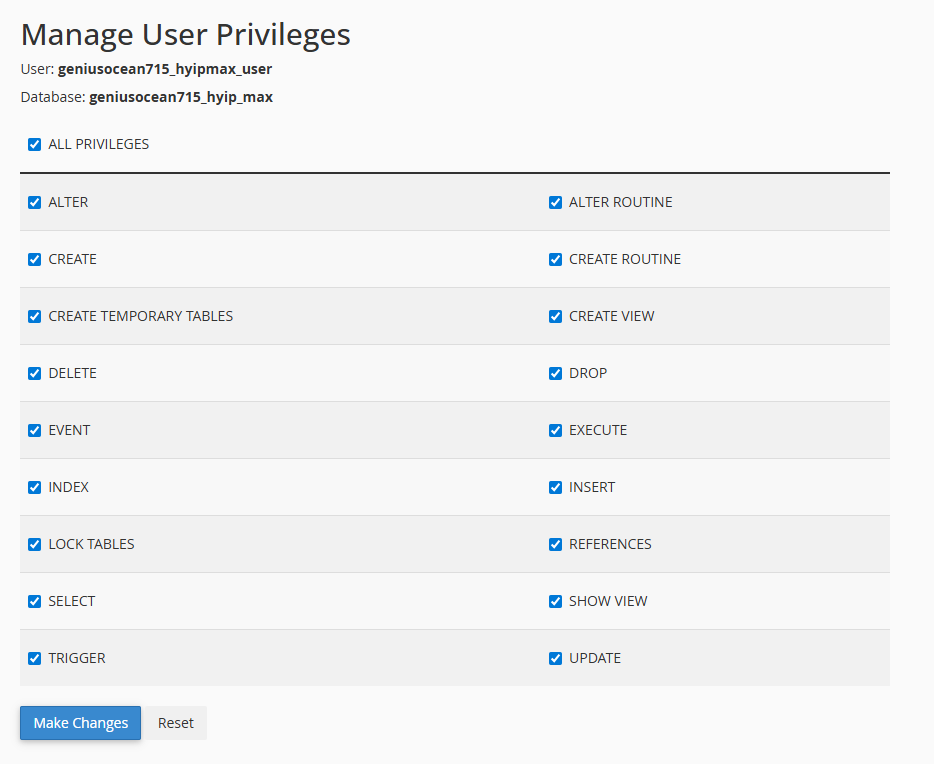
- Step 5. Now a permission page will come. Just check the tick mark on "ALL PRIVILEGES" and you will see all the options will be automatically checked.
- Step 6. Database and user creation step is done. Now go back to home and again search like before with the word "phpmyadmin". Click on the "phpMyAdmin" option.
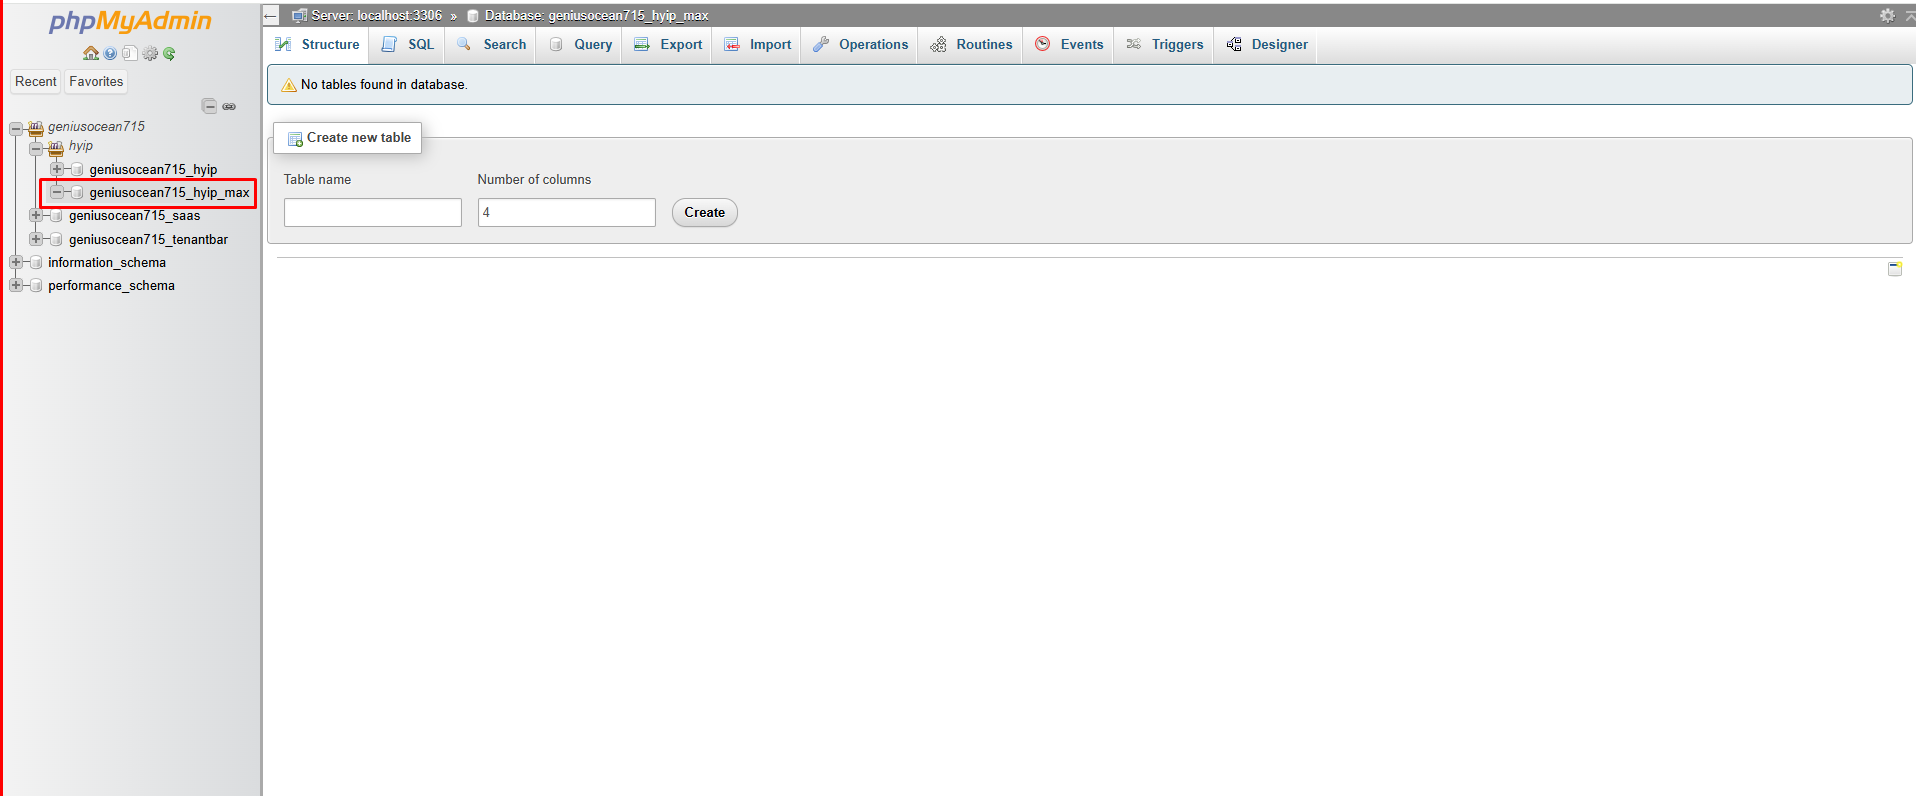
- Step 7. Now the main phpmyadmin page will come. Click on the newly created database "cleantech_charity_latest" from the left side. You can choose any name.
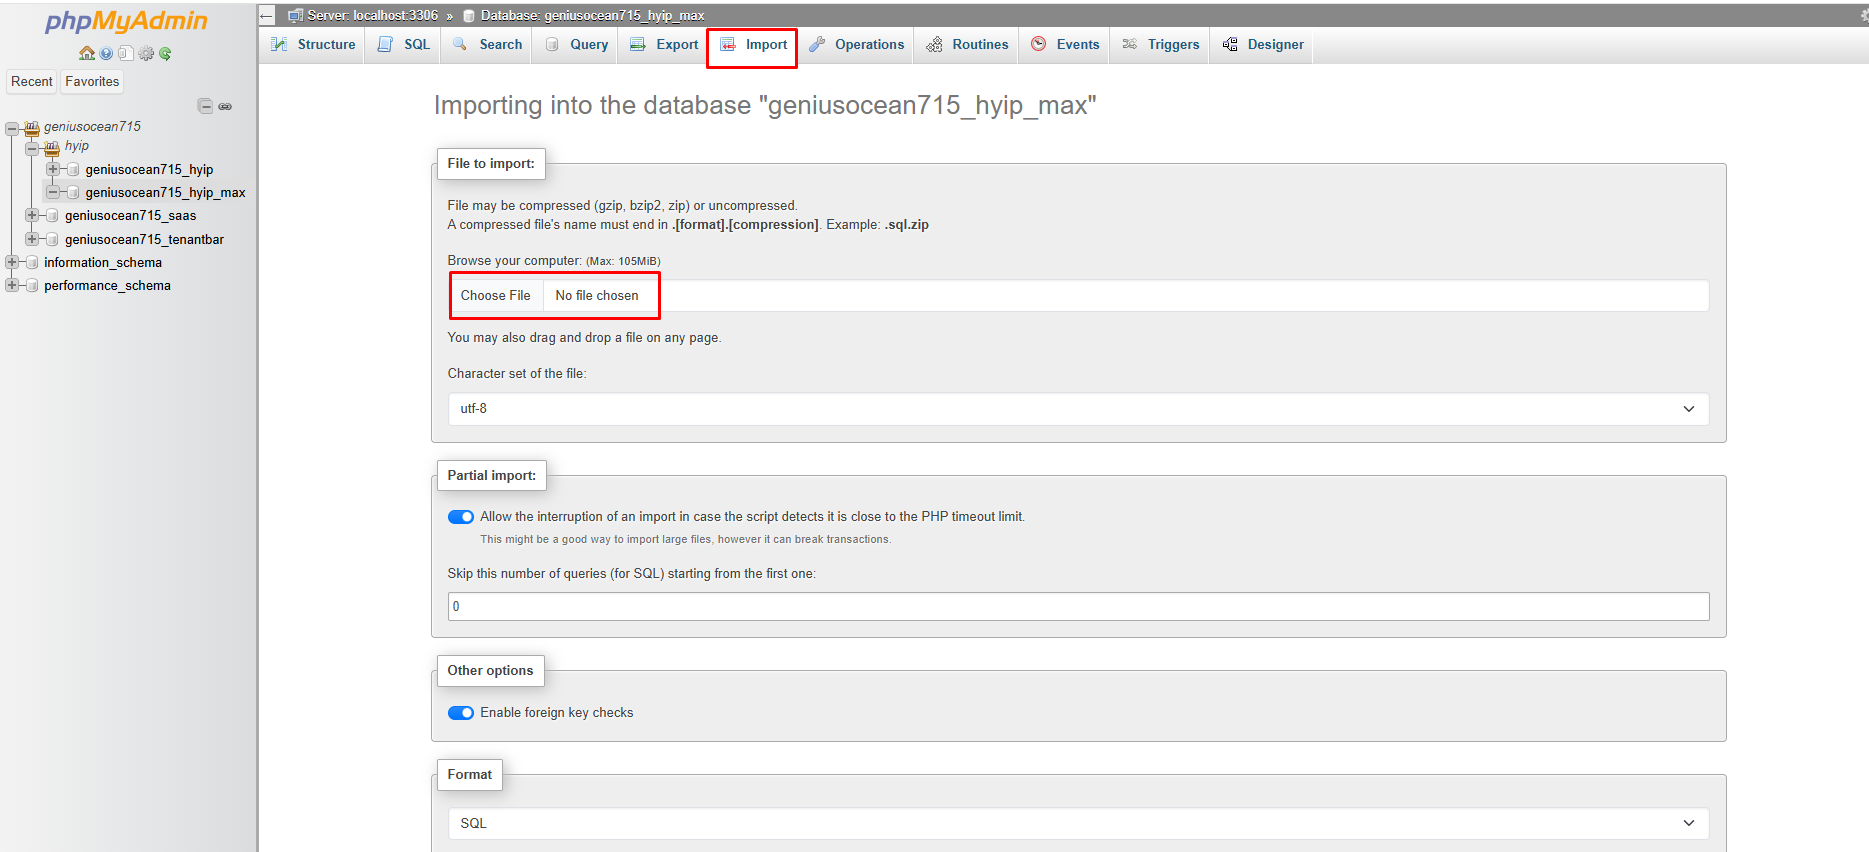
- Step 8. Click on the "Import" option from top and then select the file "database.sql" that is in the "database" folder of the script. then click on "Go" button from bottom.
- Step 9. After the task is successful, you will get a success message.
- All task related to database is done.Now Uploading Files using Cpanel.
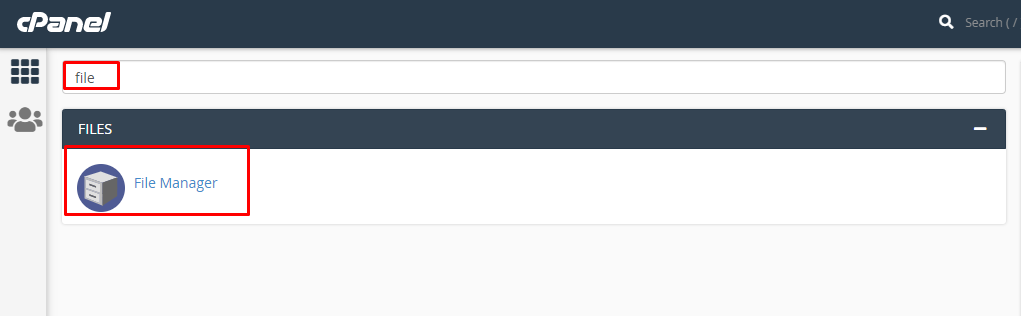
- Step 10. In the search field of your cpanel, write the word "file". You will get a "File Manager" option. Click on that option.
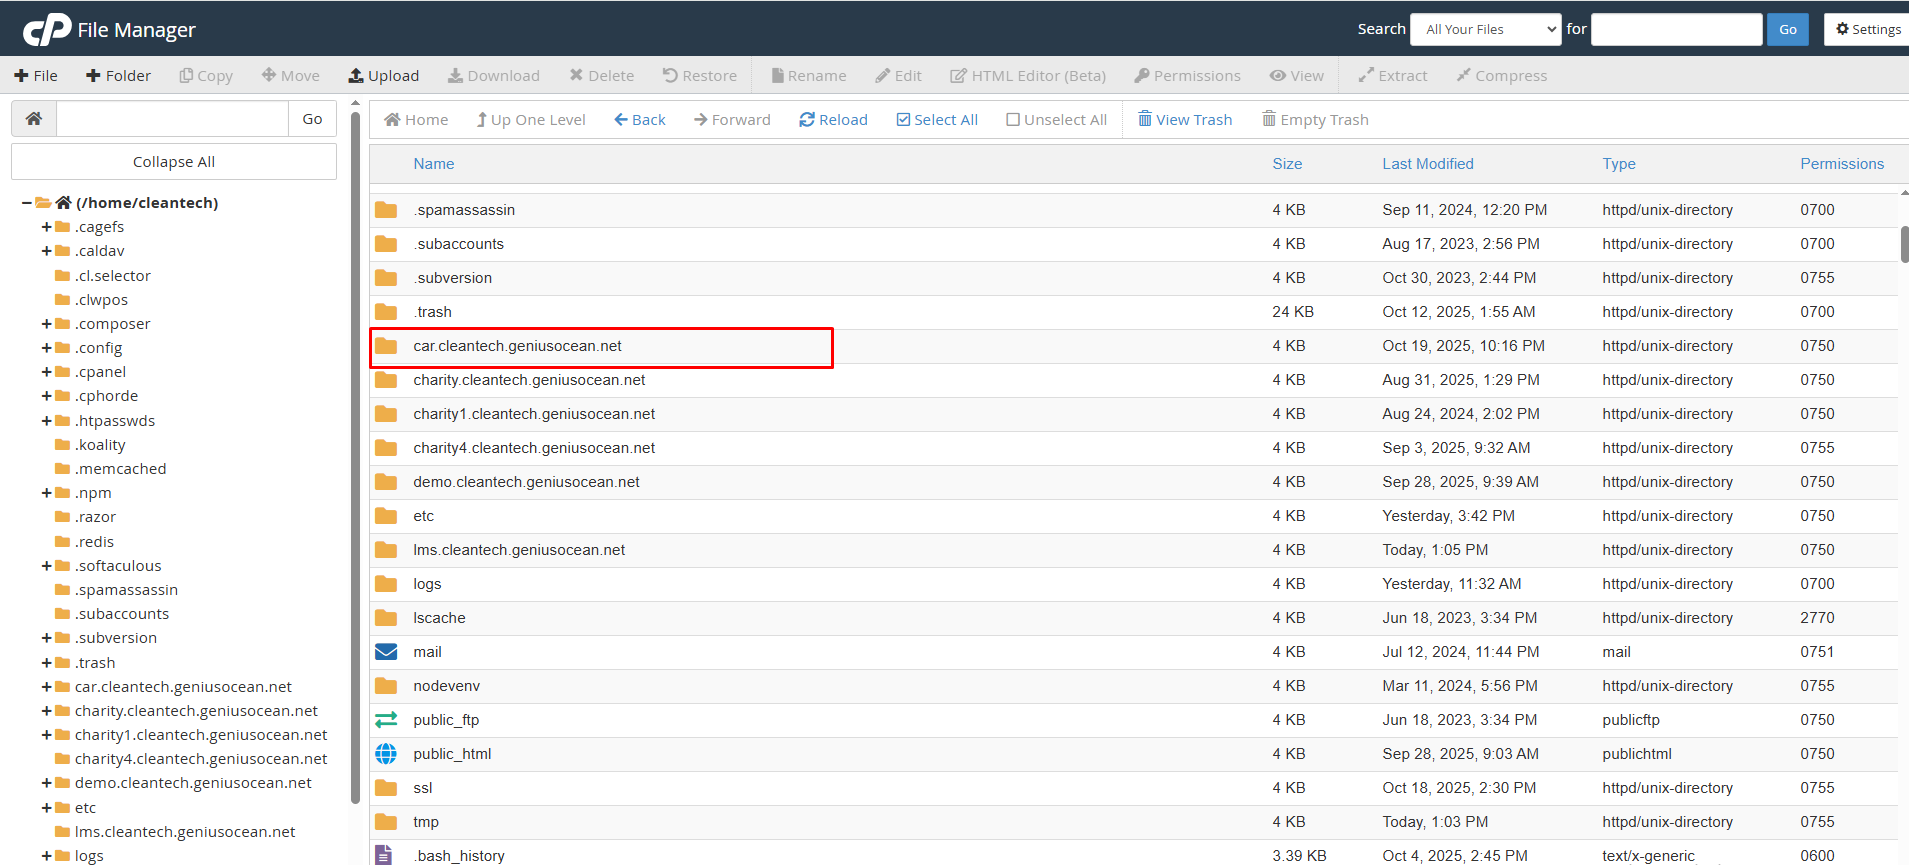
- Step 11. Then We use car.cleantech.geniusocean.net as a test deployment folder, you can choose or create folder.
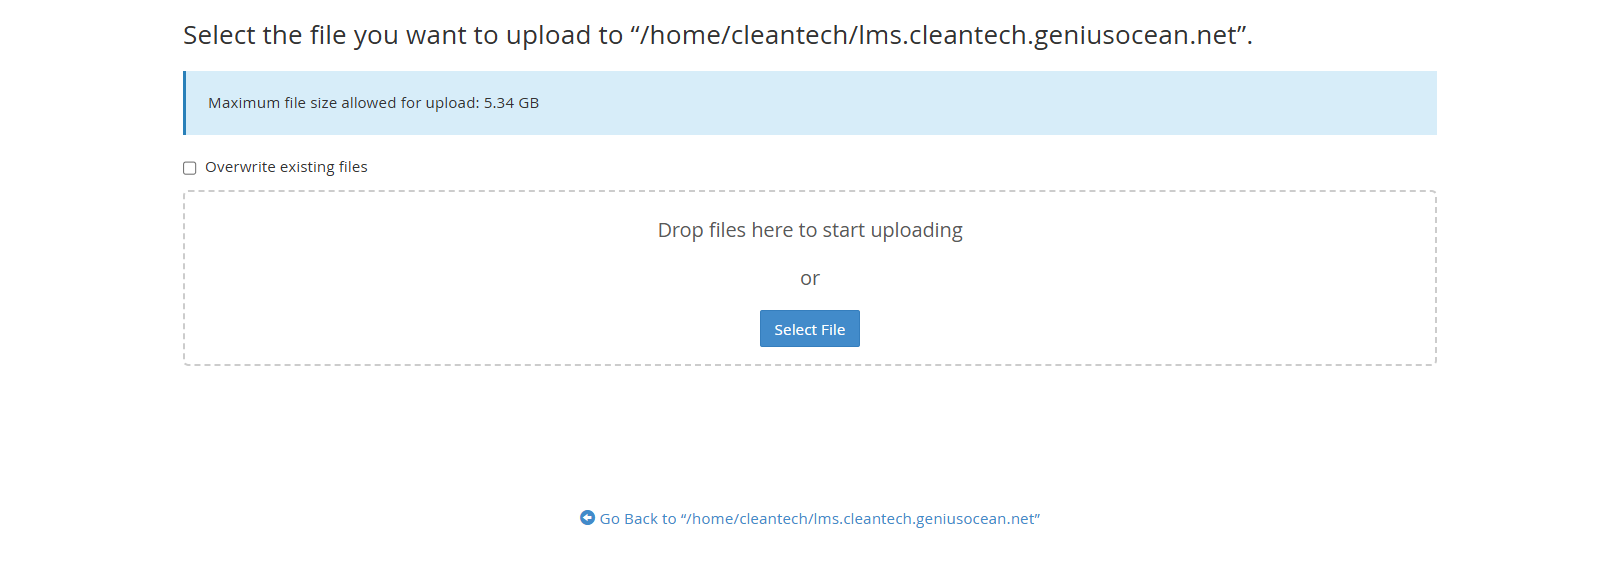
- Step 12. As we have used car.cleantech.geniusocean.net as our deployment folder. Then upload project.zip file inside of that folder.
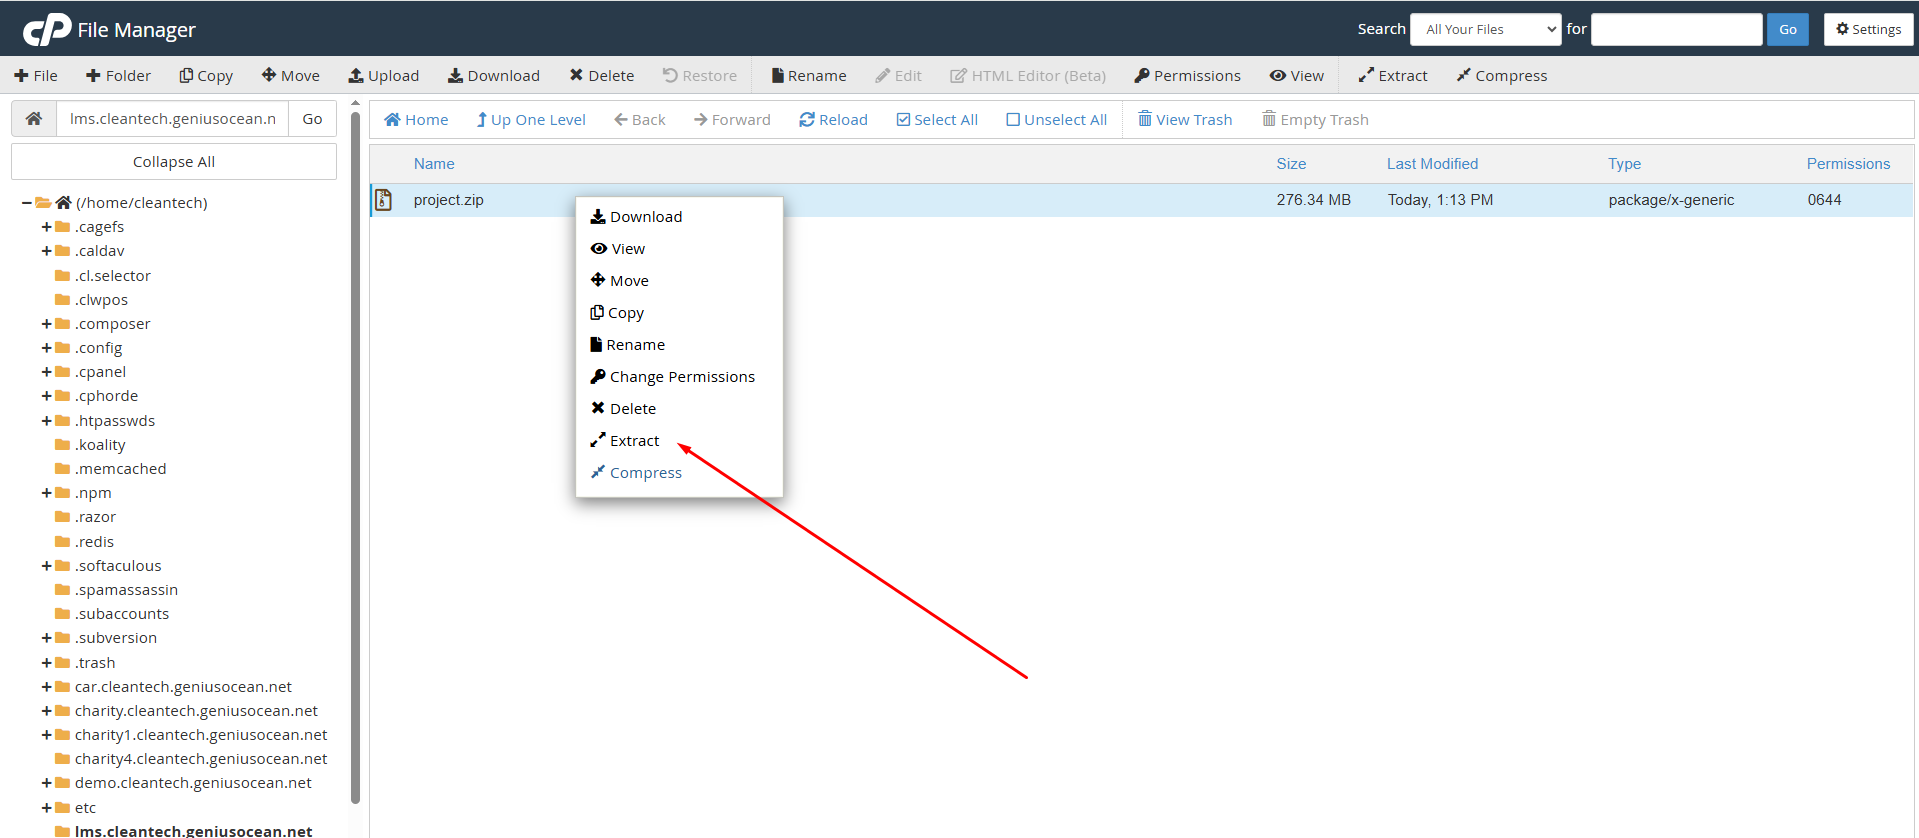
- Step 13. After uploading the files extract files there, then remove zip files from that folder.
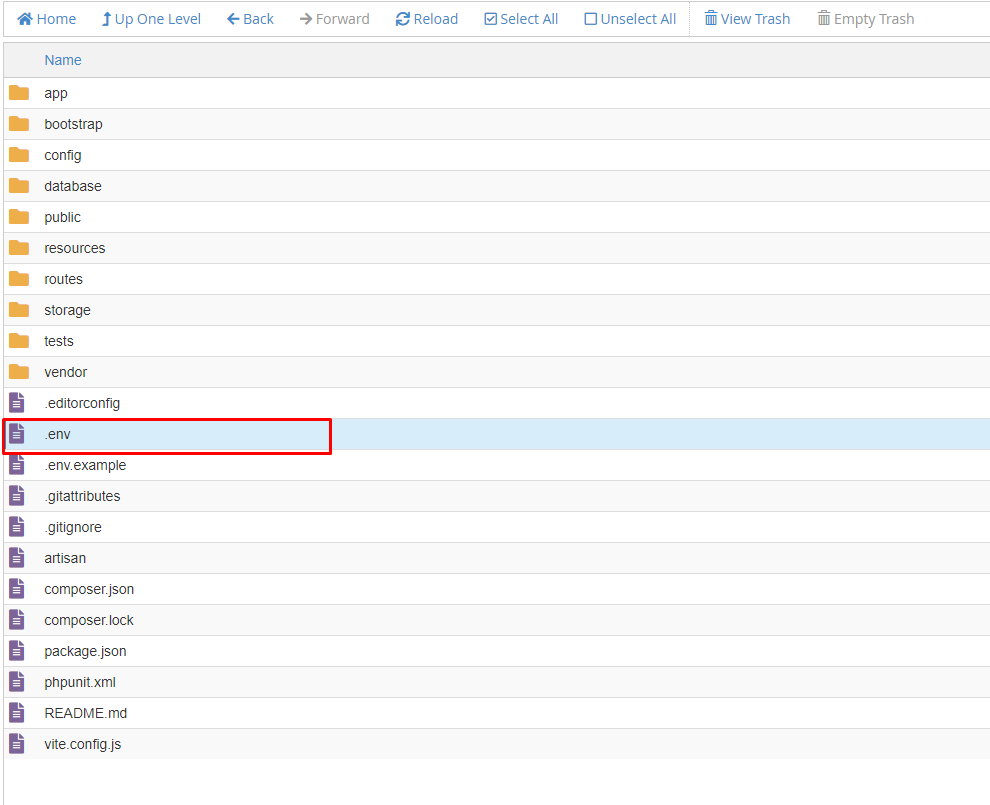
- Step 14. Then go to- Backend folder -> Project -> Select .env file
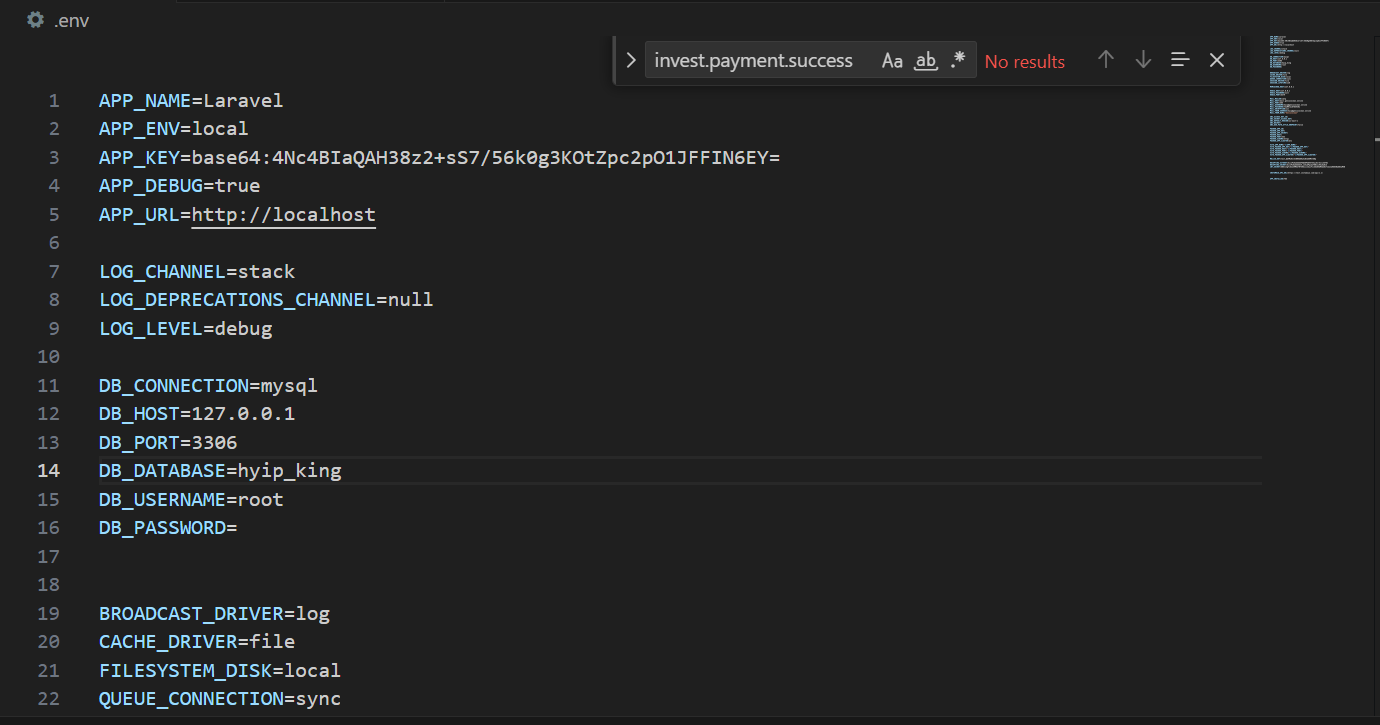
- Step 15. Then make these changes, put your database name, put user name and password there.
The installation of this script is super easy. If you can install normal php based scripts
on your server, you can install our script. We will tell you how to install this script step
by step on a server.
If you extract the zip file, you will see that there are total 2 folders.

The folder names are: database and project Zip file. The "database" folder contains the main database file "database.sql". The "project" contains the whole website.
If you extract the zip file, you will see that there are total 2 folders.
The folder names are: database and project Zip file. The "database" folder contains the main database file "database.sql". The "project" contains the whole website.
--Then Add user to Database.


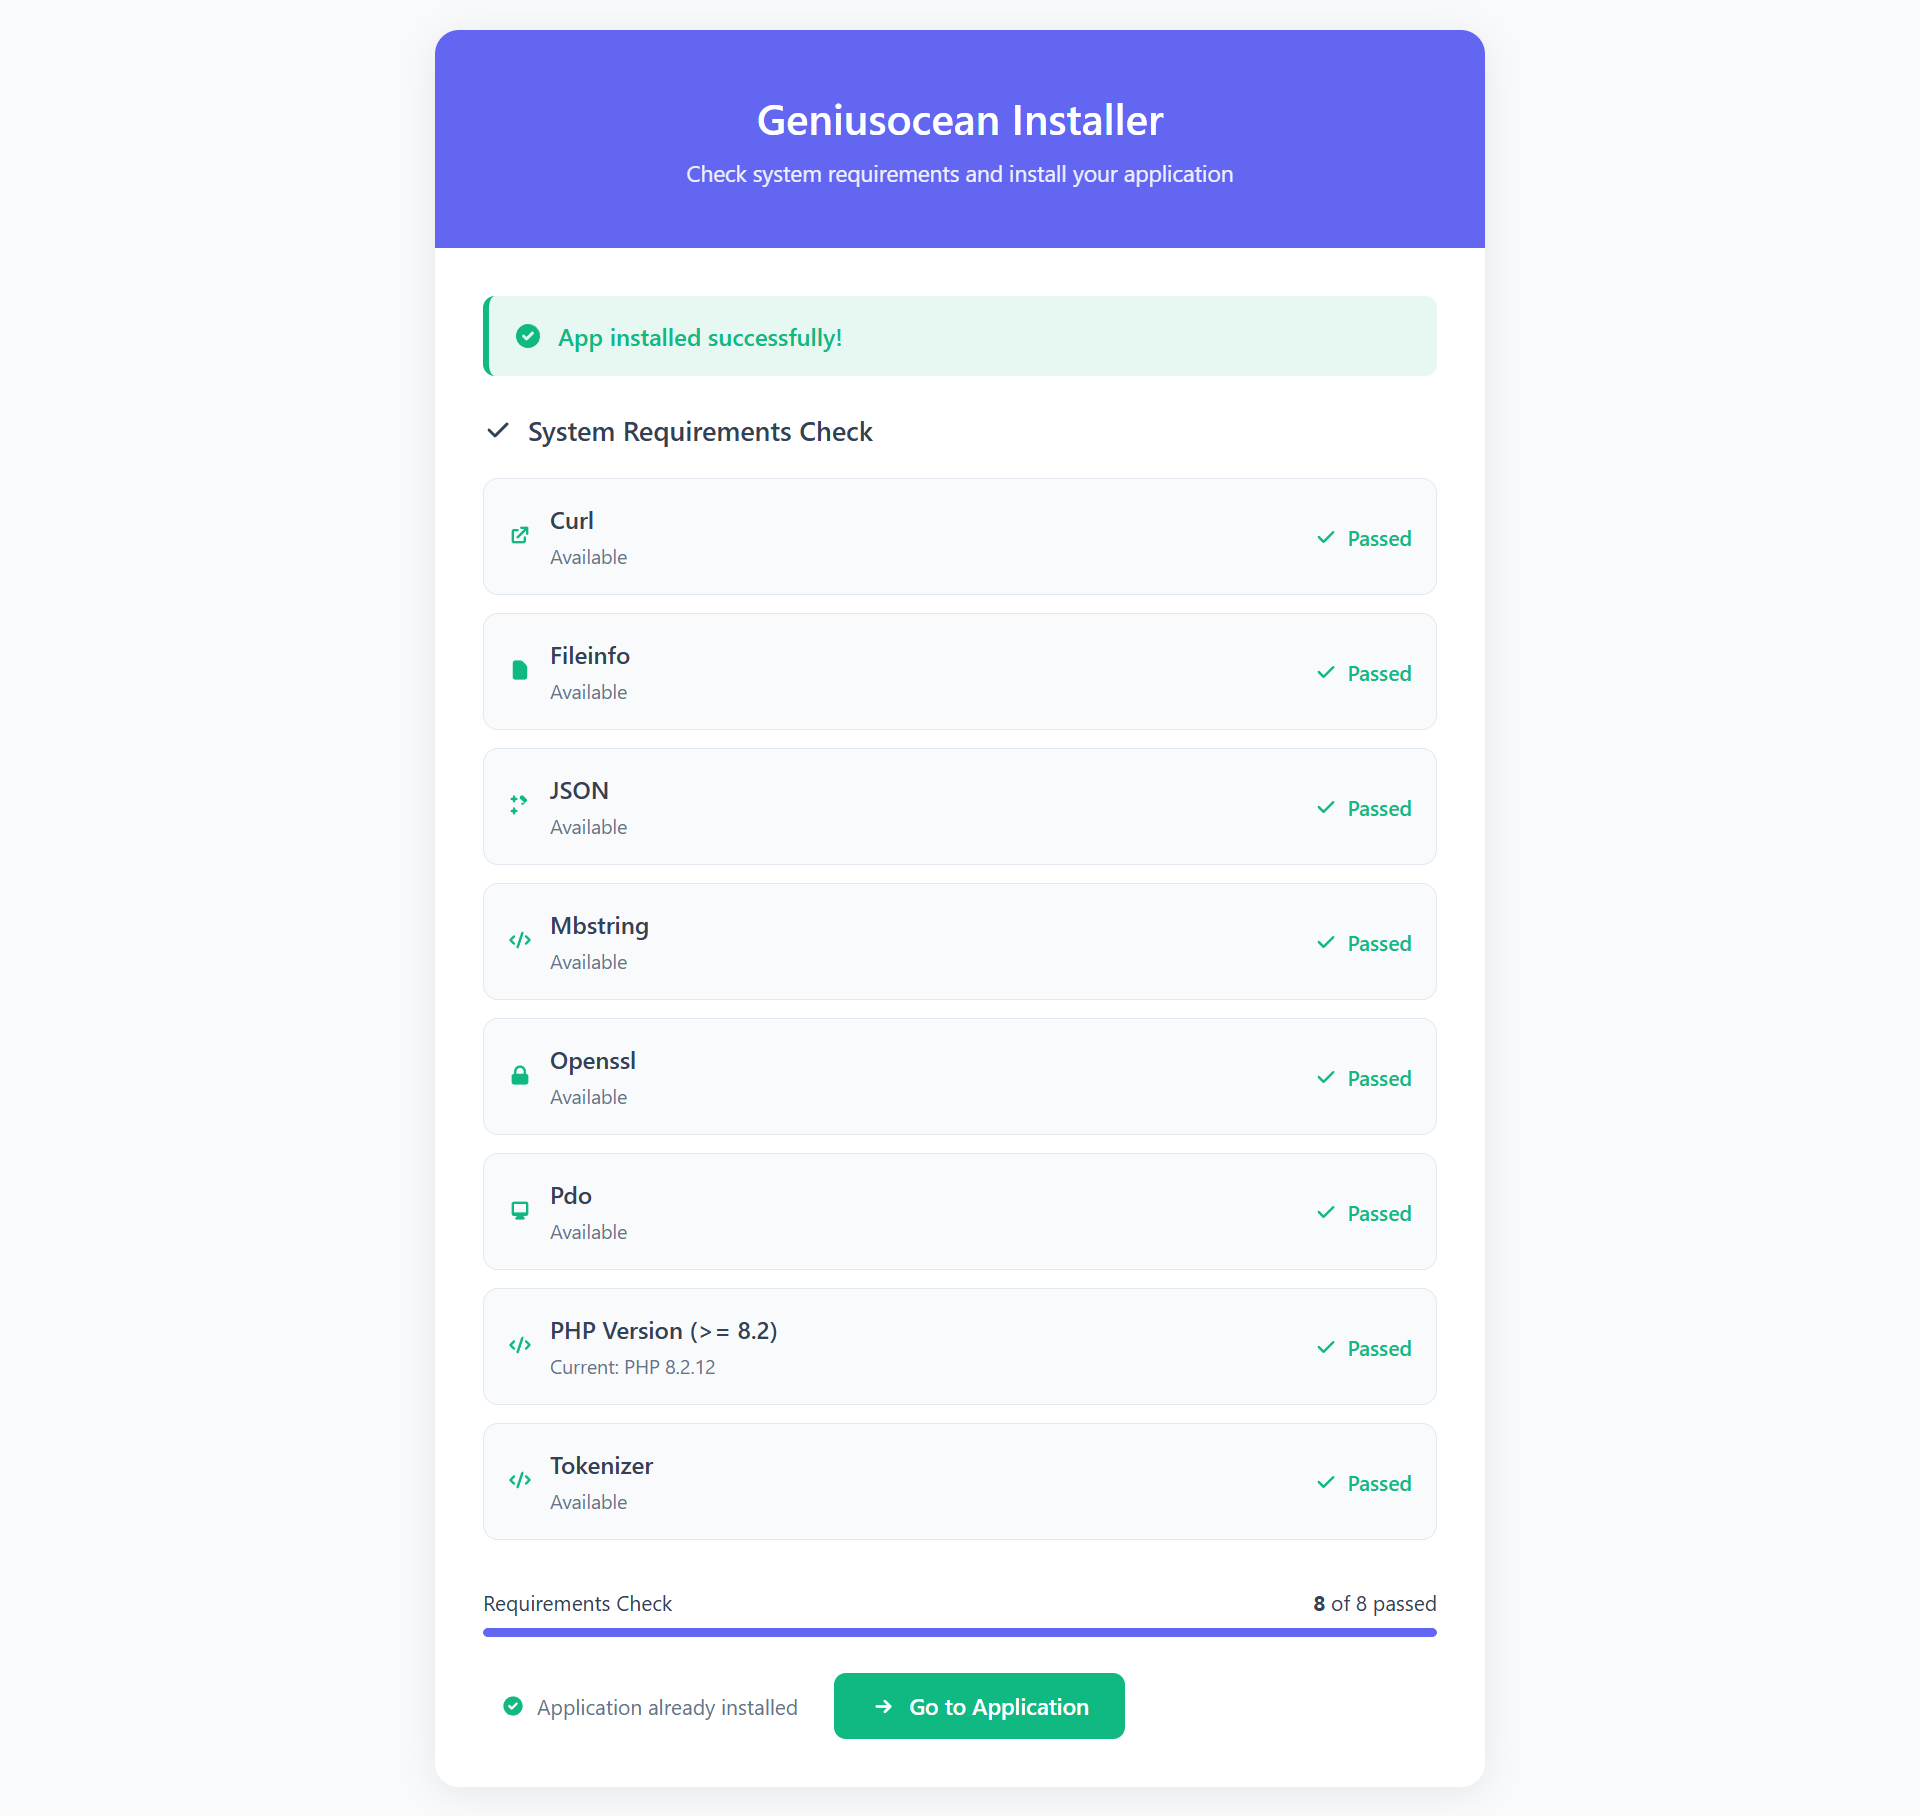
Your task is Almost done! Now hit the URL. You will get Installter. Click on Check Requirements
The system setup is complete, and upon navigating to the Homepage, the site is confirmed as fully operational and ready for use.
To login into admin panel, visit:
yourwebsiteURL.com/admin
User: admin@gmail.com
Password: 1234
Admin Profile:
From the Admin Profile section, Admin can manage their own account details. Clicking on the dropdown beside the profile photo will show options to:
- Edit Profile: Update personal account details such as name, email, and profile photo.
- Change Password: Reset and update password securely.
- Logout: Safely logout from the system.
This section ensures Admin can maintain account security and update profile information anytime without database access.
Dashboard:
The Dashboard gives a comprehensive snapshot of the platform’s key metrics. Admin can
quickly access total users, active subscriptions, revenue, support tickets, pending
approvals, and recent activities.
It also features shortcuts to manage essential sections such as User Management, KYC
Applications, Deposit Requests, Investment Plans, Transactions, Notifications, and Reports.
This allows Admin to perform critical actions efficiently without navigating through
multiple pages.
Manage Users:
This section provides a complete list of registered users with essential details: username, email, user role, account status, total deposits, active investments, referral stats, and available actions. Admins can view user profiles, edit user information, adjust balances, add/subtract funds, suspend or delete accounts, and send direct messages.
- Search & Filter: Find users by name, email, phone, or ID.
- View Profile: Detailed view including KYC status, transaction summary and referrals.
- Account Controls: Activate, suspend, or permanently delete user accounts.
KYC Management
KYC Management helps you verify users to meet regulatory requirements and reduce fraud. Admin can review submitted documents, approve or reject applications, customize the KYC form fields, and configure KYC-related settings like required documents and auto-approval rules.
Pending Applications:
Lists all pending KYC applications. Admin can open each application to view uploaded
documents (ID, email, proof of address etc), add internal notes, request additional
documents, approve or reject the application, and record the decision reason.
All Applications:
View the complete KYC history across all users. Use filters to search by status
(approved/rejected/pending), submission date, and user ID. Export options are
typically available for reporting and audits.
KYC Form Manage:
Customize and reorder the fields users must fill while submitting KYC. Add new input
types (file upload, dropdowns, text fields), set fields as required/optional, and
add validation rules.
KYC Settings:
Configure global KYC behavior: enable/disable KYC, set mandatory KYC levels for
deposits/withdrawals, automatic checks, and integration with third-party
verification services if available.
Manage Referral
The Manage Referral section allows admins to monitor and configure all referral-related activities. This includes viewing referred users, tracking commissions, and setting up reward structures. A detailed referral system helps increase platform growth by motivating existing users to bring in new investors.
Referral Table:
The referral table presents a full hierarchical view of the referral network.
Admins can track each user’s referrals, referral level, total earnings, commission
history,
and referral performance.
- Filtering by user, email, starting and ending date.
- Able to delete referral list
- Viewing how many investments each referred user has completed.
Referral Settings:
This section controls the Enable/Disable Referral System, Auto Approval Bonus
enable/disable, KYC required for bonus, Able to enable/disable send referral
notifications.
User Ranking
The User Ranking module analyzes users’ performance based on multiple metrics such as total investment, completed plans, referral earnings, profit generated, and overall engagement. Admins can customize ranking criteria to highlight the top investors or top referrers.
Ranked lists can be used for:
- Actiavte and Deactivate the Level
- Able to perfom on Edit Actions
- Also delete option there
Countries
The Countries section allows admins to enable or disable countries for user registration and transactional activity. This is useful for controlling platform access based on region-specific rules and compliance requirements.
Each country entry may include:
- Country name & ISO code.
- Allowed / Restricted status for new user signups.
- Supported currency & formatting.
Manage Investments
The Manage Investments module oversees all user investments across the platform. Admin can see Pending Investments, All Investments, Active Investments, Completed Investments and Cancel Investments.
Pending Investment:
Displays all investments awaiting admin review—usually pending payment verification.
Admin actions include:
- Able to Export as CSV Files.
- Activating the investment to start profit generation.
- Rejecting invalid entries with proper reasons.
- Automatically notifying users via email/SMS after approval or rejection.
- Able to filter by user name, plan and date
All Investments:
A master record of every investment made by all users.
This section supports advanced filtering and reporting.
- Filter by user, date, amount, investment plan, or status.
- Export reports for audit or accounting departments.
- View ROI history and profit distribution logs.
- Monitor large-volume investor activity for compliance.
Active Investment:
Shows all investments that are currently running and generating profits.
Useful details include:
- Daily/weekly/monthly profit breakdown.
- Investment maturity date.
- Option to pause or force-complete investments if needed.
Completed Investment:
This section lists investments that have fully matured.
Admins can view:
- Principal returned to user.
- Total profit generated.
- Payout logs and history.
- Whether the investment was auto-completed or manually processed.
Cancaled Investment:
Shows all investments that were terminated before maturity.
This section includes:
- Reason for cancellation.
- Refunded amount (if applicable).
- Admin notes or internal comments.
- User-requested cancellations vs. admin cancellations.
Investment Plans
Manage the suite of investment plans offered to users. Plans define min/max deposit, ROI type (fixed/daily/compound), duration, profit schedule, and special conditions like principal return or daily cap.
Investment Plans:
Lists all created plans. From here admin can enable/disable plans, view plan stats,
and quickly see how many active investors each plan has.
Create New Plan:
Create a new investment product: set the plan name, min/max deposit, interest rate,
duration, payout interval, whether the capital returns, and whether the plan is
compound-enabled.
Manage Schedule:
Configure payout schedule for plans — daily, weekly, monthly, or custom. Adjust
time-of-day for payouts and manual override options.
All Transaction Logs
Every financial movement on the site is recorded here. Transaction types include deposits, withdrawals, investment payouts, referral commissions, admin adjustments, and fees. Each log contains Transaction ID, user, type, amount, charge, balance before/after, description, and timestamp.
Deposits
The Deposits section allows admins to track, review, and manage all incoming payments from users. It supports multiple payment gateways, manual bank transfers, and ensures that every deposit is properly validated and recorded. Accurate deposit management is essential for maintaining correct user balances and financial transparency.
Pending Deposits:
Shows deposit requests that have been submitted but are awaiting confirmation.
Admins can verify bank transfers, inspect uploaded receipts, and ensure the deposit
matches the user’s intended payment. Once verified, deposits can be approved and
credited, or rejected with an explanation. This helps prevent fraudulent or
incorrect payments from affecting user balances.
Completed Deposits:
Displays all successfully processed deposits. Admins can filter deposits by payment
gateway, user, date, or transaction ID. This allows staff to quickly analyze
transaction
patterns, audit completed payments, and resolve any user inquiries related to
deposits.
All Deposits:
A historical record of every deposit made on the platform. This is essential for
audits, reporting, and ensuring complete transparency of all user transactions over
time.
Manage Withdrawals
Allows admins to oversee all user withdrawal requests, verify eligibility, and manage payout methods and fees. Ensuring smooth withdrawal management is critical for user trust, financial accuracy, and preventing fraudulent activity.
Pending Request:
Lists withdrawal requests that are awaiting admin approval. Staff can verify the
recipient’s details, and either approve or
reject requests with notes. This ensures funds are only released securely and to
authorized users.
All Withdrawals:
Displays a complete history of withdrawal activity, including approved, rejected,
and pending transactions. This allows admins to audit past payouts, generate
financial reports, and respond to user inquiries about withdrawal status.
Withdraw Methods:
Configure available payout options such as bank transfer, crypto wallets, or
e-wallets. Admins can set minimum/maximum limits, fees, and enable/disable specific
methods. Proper configuration ensures users can withdraw funds conveniently and
securely while maintaining platform compliance and controlling transaction costs.
Able to add, edit and delete the methods, also able to make active/inactive.
Request Money
The Request Money section manages peer-to-peer transactions where users can request funds from other users. Admins can oversee all requests, enforce limits, and configure system behavior to ensure fair, secure, and reliable money exchanges.
Pending Money Request:
Shows requests that have been sent but not yet acted on by the payer or reviewed by
admin. Admins can monitor pending requests to ensure timely completion and
investigate any disputes or issues.
All Money Request:
Displays a full history of money requests, including completed, pending, and
rejected requests. This helps admins track user interactions, resolve disputes, and
maintain transparency for all peer-to-peer transactions.
Money Request Settings:
Allows admins to configure request limits, expiration times, notifications, and
auto-expiry rules. These settings help prevent abuse, ensure timely responses, and
provide a controlled environment for peer-to-peer money requests.
General Settings
Core site settings that affect the entire platform. Adjust site identity, operational parameters, language, branding, and overall user experience.
Site Settings:
Configure essential site information such as site title, contact email, operational
status (online/offline), and default currency for
transactions. These settings impact the entire platform.
Logo & Favicon:
Upload and manage the main site logo and favicon images to maintain consistent
branding across the website, browser tabs, and marketing channels.
Language:
Set the default language, add multiple languages, and manage translations for both
frontend and admin panel. This ensures content is understandable to a global or
regional audience.
Error Page:
Customize the look and content of error pages (404, 500, etc.) to provide clear
navigation and a better user experience when users encounter issues.
Third Party Script:
Add custom JavaScript snippets such as analytics, chat widgets, or pixels. These
scripts enhance site functionality and track user behavior without modifying core
code.
Plugins:
Manage optional modules that extend platform functionality. Enable or disable
plugins depending on the features needed by your website.
SEO Settings:
Configure global meta tags, default title templates, and sitemap options to optimize
search engine visibility and improve organic traffic.
Preloader:
Enable or disable a page preloader animation. Upload custom animations or images to
enhance user experience while pages are loading.
Email Settings
Configure how your platform sends emails to users. This includes system notifications, marketing campaigns, and transactional messages.
Email Configuration:
Setup SMTP or transactional email services with proper credentials, sender email,
and test functionality. Ensure email delivery is reliable for all system
notifications.
Email Template:
Create and edit HTML/text templates for user communication such as registration
confirmation, deposit alerts, withdrawal notifications, password resets, and
marketing campaigns. Use dynamic placeholders like {user_name} or {amount} to
personalize messages.
Send Group Email:
Send emails to specific user groups or segments. Apply filters for recipients and
schedule emails in advance to efficiently manage announcements or campaigns.
SMS Settings
Integrate SMS providers to send transactional or promotional messages to users. Ensures timely notifications for important actions.
Nexmo:
Configure Nexmo (Vonage) API credentials for sending SMS. Test messages to ensure
correct delivery and template formatting for user notifications.
Twilio:
Setup Twilio API credentials to send SMS notifications. Debug templates, events, and
delivery logs to maintain reliable communication with users.
Currency Setting
Manage the currencies available on your platform, including default currency, conversion rates, and user deposit/withdrawal options.
Add new currencies, configure exchange rates, and control which currencies are active for transactions, ensuring accurate financial operations.
Payment Gateways
Integrate and configure payment gateways including crypto, bank transfers, and third-party processors. This ensures users can deposit and withdraw funds efficiently.
Set credentials, enable/disable specific gateways, configure deposit/withdrawal limits, and apply special rules for each payment method to optimize user experience and security.
Manage Staff
Admins can create staff accounts, assign roles, monitor activity, and control access to admin features. This ensures proper delegation and security of backend operations.
Manage Role
Configure Role-Based Access Control (RBAC). Create roles, define permissions, and assign roles to staff users to restrict or grant access to specific admin features.
General Settings (Frontend Blocks)
Breadcumb:
Manage breadcrumb banners and titles for frontend pages, helping users navigate the
site and understand their location within the website structure.
Theme Manager
Its Pending..
Home Page
Manage the dynamic content blocks displayed on the homepage, including hero section, counters, plans, testimonials, FAQ, and more to create an engaging first impression.
Hero Section:
The top-most visual section of your homepage. You can edit the title, subtitle,
background images, call-to-action buttons (like “Sign Up” or “Invest Now”), and
featured images. It’s the first thing users see and is crucial for making a strong
impression.
Counter:
Shows live statistics such as total users, total deposits, total payouts, and top
investors. You can set starting numbers and enable auto-update to display dynamic
growth to visitors.
About Us:
A section describing the company or platform on the homepage. You can set a blurb,
images, links, or mission statements. Often includes “Learn More” buttons linking to
a dedicated About Us page.
Plans Section:
Displays selected investment plans on the homepage. Admins can edit section
headings, choose which plans appear, and control layout (grid, slider, or list).
Helps users quickly understand available investment options.
Profit Calculator:
Interactive tool allowing users to estimate returns based on selected plan, deposit
amount, and duration. Admin can configure formulas, default values, and styling.
How It Works:
Step-by-step instructions for new users on how to register, deposit, and invest. Can
include icons, short text, and illustrations for clarity.
Deposit & Withdraw:
Section for Informing the users about benefist of deposit and withdrawal process.
Testimonials:
This section for testimonials information such as Title, Sub title, details text and
images. admin able to set these from here.
FAQ:
Frequently asked questions displayed on the homepage. Helps users quickly find
answers without contacting support. From here admin can set faq section details.
Top Investor:
Highlights top-performing investors on the platform. Can be manually selected or
auto-generated based on user rankings.
Latest Blog:
Displays selected blog posts on the homepage. Helps keep content fresh, improve SEO,
and showcase latest updates or announcements.
Team Member:
Showcases platform or company team members. Can include names, photos, roles, and
short bios.
Payment Methods:
Displays accepted payment gateways/logos on the homepage. Can include instructions
or links for depositing and withdrawing.
Affiliate Program:
Displays details about referral/affiliate programs. Shows banners, links, and
instructions for users to earn by referring others.
Blog Page
Manage all aspects of blog content including posts, categories, comments, and blog-specific SEO to drive traffic and engagement.
Blog Category:
Create and organize categories to structure blog content for easier navigation and
better SEO.
Add New Blog:
Create new blog posts including images, tags, and SEO metadata to attract users and
search engines.
All Blogs:
Overview of all blog posts with options to edit, delete, moderate comments, and
control publishing status.
Blog Comments:
Moderate user comments on blog posts. Reply, approve, or delete inappropriate
comments to maintain content quality.
Blog Settings:
Configure blog display, post limits per page, and commenting behavior to maintain
consistent blog management.
Others Page
Static content pages that appear across the platform. These pages are essential for providing users with information, support, and functional instructions. They ensure a professional presentation of the platform and improve user trust and engagement.
About Us:
This page introduces your company or platform to users. Admins can update company
description, mission, vision, values, history, and achievements. It may include
multimedia elements such as images, videos, or infographics to make the page
visually appealing. Well-written About Us content improves credibility, builds
trust, and encourages user engagement by making the platform feel more personal and
reliable.
Contact Us:
The main page for user inquiries. Admins can configure contact form recipients,
displayed phone numbers, emails, office addresses, and map locations. Custom success
and error messages help users understand if their inquiry was sent successfully.
This page ensures users can reach support quickly, improving satisfaction and trust
in your platform.
FAQ:
Frequently Asked Questions page that reduces repetitive support requests. Admins can
categorize questions, add detailed answers, and arrange them in a logical order.
Helps users find solutions instantly, enhances user experience, and decreases the
workload on support staff. Well-structured FAQs can also improve SEO by targeting
common search queries.
Testimonial:
Display user reviews or feedback across the site. Admins can include client names,
photos, roles, and detailed comments. Rotating or static testimonials give social
proof, which is highly effective in building trust and persuading new users to
register or invest. Testimonials can also reflect the platform’s credibility and
reliability over time.
Team:
Showcases platform or company team members. Admins can add profiles with names,
roles, short bios, and social links. A visible team humanizes the platform, builds
credibility, and allows users to connect with the people behind the service. It also
emphasizes transparency and professionalism.
Create Account:
Controls the user registration experience. Admins can edit instructions, required
fields, validation messages, terms & conditions, and optional welcome content.
Properly designed registration pages increase conversion rates by making the signup
process smooth and easy to follow.
Login:
Manages the login page for returning users. Admins can configure standard login
fields, social login options, error messages, and password recovery flow. A clear
and secure login process ensures user trust and prevents login frustration. Custom
instructions or hints can improve usability and reduce support tickets.
Payment Successful:
Customize messages shown after successful deposits or transactions. Admins can add
instructions for next steps, confirmation notes, or links to investment dashboards.
Clear success messages reassure users that their transaction was completed correctly
and improves overall user experience.
Payment Failed:
Configure failure messages for unsuccessful transactions. Admins can provide retry
instructions, support contact info, and troubleshooting tips. Properly informing
users about payment failures reduces confusion, prevents frustration, and guides
them to successfully complete their transaction.
Custom Page
Create and manage standalone pages for promotions, landing pages, or announcements to enhance marketing campaigns and special events.
Create New Page:
Build a page using the page builder, and assign a slug/URL for
frontend access.
All Custom Pages:
Manage published or unpublished custom pages, edit content, and optimize SEO
metadata for visibility.
Support Ticket
Full support ticketing system that allows users to communicate with the support team. Admins can view, reply, categorize, and resolve tickets efficiently. Each menu under this section helps manage tickets at different stages of the support workflow to ensure timely responses and improved user satisfaction.
All Ticket:
Displays a unified list of all support tickets submitted by users. Admins can filter
by priority, user, date, or status. Provides quick access to every ticket in the
system, enabling staff to manage workloads, track pending issues, and ensure no
ticket is overlooked.
Pending Ticket:
Lists tickets that have been submitted but not yet responded to by support staff.
Admins can prioritize tickets, and ensure that every
new inquiry receives a timely initial response. Helps maintain high user
satisfaction and reduces response delays.
Open Ticket:
Admins can track
progress, see responses, and manage ongoing communication. This menu ensures that
tickets in progress are monitored so that no active issue is neglected.
Resolve Ticket:
Admins can review, edit, or reopen these tickets if needed. This
stage allows verification of solutions and gives users the opportunity to confirm
that their issue has been satisfactorily addressed.
Closed Ticket:
Contains tickets that have been fully completed and archived. Admins cannot make
further changes unless reopening a ticket. This menu helps maintain a clean ticket
system by separating completed issues from active ones, while also providing
historical records for reference or audits.
Ticket Categories
Define categories like Billing, Technical, and General to organize tickets, improve response times, and streamline support operations.
Push Notifications
Configure web push notifications for users, including subscription keys, templates, and automated messages for transactional events such as deposits, withdrawals, or payouts.
Clear Cache
Utility to clear application caches, reset compiled views or configuration caches, and view cache sizes. Essential for deployments, updates, or troubleshooting performance issues.
Developer Support
We are always happy to hear from you. Please feel free to contact us for any kind of
customization, support, query and suggestion. We will respond as soon as possible. We reply
all our emails within 36 hours. Please email us from our profile so we can verify you as our
client and help you to solve any issue.
Our profile: https://codecanyon.net/user/geniusocean
Thank you,
GeniusOcean
Or
Contact Us
Social Media:
Manage links to social media profiles and configure sharing metadata. Ensures consistent social presence and makes content easily shareable.